I have been down to see Tim in plastics and he has given me the colours of some plastics that I could use if I was to produce my information onto plastic. My new concept is based around the use of tinted plastic. I want to etch my information onto tinted plastic and make rectangular panels that can be attatched together to form rectangular 3-dimensional plastic shapes. After looking at different etched plastics, I found the the tinted ones show text more clearly. Also, I have found that if the text is etched into the reverse side of the plastic then viewed from the opposite side, you get a really nice smooth finish to the etch and when a light source is placed on the bottom edge of the plastic, the information glows. I love this concept and so I am going to develop the sides of each of the plastic models.

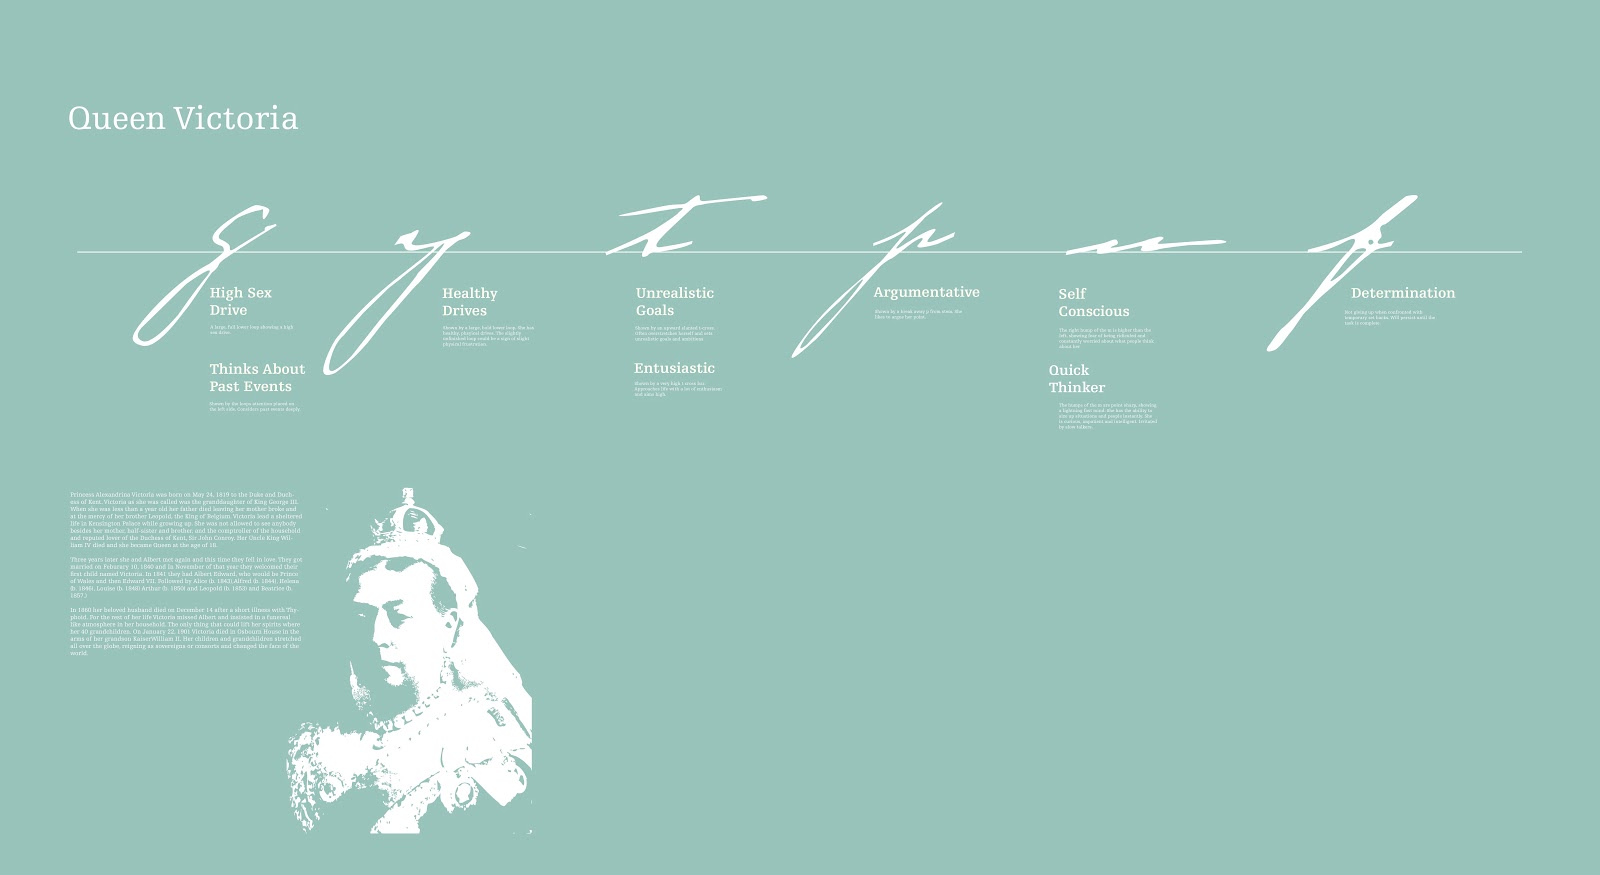
This is my starting point idea. Though it is not panels, It shows an initial concept for layout and structuring of type. I have placed all of the letters that I am highlighting on a baseline so that the overall composition has more structure. I have also included a small biography of Queen Victoria and a stylised image of her (if I am to continue with this idea I will refine this image. I think that now the content is more structured and more visually appealing. I am now going to try translating this into panels.

This is my idea for the panels. It uses two lines for the baseline where type will be wrapped around. The two baseline lines will run around the 3 sides. The information will be displayed in a column on the left hand side of each of the panels. There is consistancy in type size and leading on all panels and all information. When I have to use a diagonal line to point out an area of the type, then this diagonal is a consistant angle throughout all of the boards. I am structuring the letters and the placement of letters through their use of the upper zones and lower zones. Letters with a lower zone/ decender generally go on the top line, letters with an ascender generally go on the bottom Line. This aids balance and consistency in design.
I am now going to work on the editing of the images.
Process of creating the images-
Here is charles dickens. I have selected a background that is dark. First, I have altered levels so that the background is particularly dark. This increases the detail in the live trace vector image.
I have to invert the image so that the negative areas are live traced. Otherwise, when i come to lazer etch the images I will have a negative image.
To make it a vector, I change the path fitting to 1 px and the minimum area to 0px so that I can get as much detail from the image as possible. I then select the ignore white so that only the black areas are shapes.
I then edit the threshold until I get the amount of detail in the image that I am happy with, here the image has a fair amount of detail but is consistent with the other images I have produced.
Then when put into indesign, I change the colour of the vector to white. Here you can see a fair amount of detail in the face which I am happy with.
I am not happy with my Florence Nightingale image and so I am going to re-do this image, I need to select an original image that has a darker background before I proceed with the editing and converting to vector.
This time the image that I have selected has a darker background initially.
This has resulted in a much better vectored image that does not have a background, other than a little bit of shadow in the bottom left corner above her shoulder. This has created a much better final image that is consistent with the other images on the other boards I have designed.
Looking at the overall layout of the four boards, there are a couple of things that bother me. Firstly, all of the information is too high and not centered. This is fine, I can just move all of the information down slightly. I think that it should be slightly higher than center but only marginally, just so that it looks balanced. I need to sort out the text placement. Also, non of the text is aligned with the board it is next to, so the information looks unorganized I am going to re-position text and restructure the lines linking the information with the relevant parts of the type so that the text is more orderly.

Now the type is much more ordered and is easier on the eye. I now just need to do this for the other 4 sets of boards for the 4 Victorian writers.
Here, I have changed the height of some of these boards so that the free-standing structures have a varying height (to make them more visually interesting and dynamic to the viewer). Then, I need to change the background colours of these boards. They are going to just have a tint of colour. My colours need to reflect this. The one shall be a blue tint, so this one is already done. I think I will make it easier on myself to edit them the way that I intend if I put them all into one document so that I can view them all together. That way, I can also check on consistency of information layout.
In order to get a convincing 3d model of what I am designing, I have applied a gradient to the background colour of each of the panels. Obviously this in real life would only be a tint of colour, but this is very hard to recreate in indesign and photoshop. I am being considerate in that the light source will come from the bottom, so more colour will be visible in the upper parts of the plastic.

These are 3 attempts at trying to render a light source. Obviously, the most successful is the panel on the right and so this is the panel I am going to base all of my models on.
I am creating my 3 dimensional models in Photoshop paying particular attention to the finer detail, making sure that the baseline lines line up around the 3 sides of the shape.
Here is a completed model of one of the exhibition objects. I have put a platform of plastic in the model so that I can place the original letter that the analysed text has been taken from. I think that I want to put these models on legs as I want an interesting light pattern on the floor of the exhibition space. The exhibition space walls are dark in colour and the lighting low.
This is the final visualisation of my exhibition space. I have put the plastic rectangular prisms onto legs. I think that the overall size of the prisms give an impressive and imposing presence. The level in the prisms where is the display of the original letter varies in height. I am now going to make a model out of plastic of one of the rectangular prisms. I am going to etch the information into them and then shine a light source underneath it to see how this would look in reality.